Friday, December 14, 2007

My Idea, One Hundred Years Late.

Audrey is from Oklahoma, slender, gray haired and bearded, looks to be in his 80's. He is in fact barely 60 but his life experience added years to his look. We were having lunch, his usual hard candies and cigarettes and me, a burger with a helping of second hand smoke.

I told him I had this great idea about gluing cork boards on the floor of my kitchen. I got the idea because the insert of my handcrafted shoes were made of cork and it’s great on my feet all day. It's supportive yet cushiony. The cork boards self-repairs after you put a pin in it. It doesn't rot from water because that’s why they use it to cork wine bottles and it must be acid resistant because wine doesn't dissolve it. So it should handle all the abuse of the kitchen.

Audrey lit up another cigarette and spent the next 20 minutes going into detail about the proper care of cork flooring because they were using the stuff since the turn of the century. I'm talking about the 1900s. It just needed to be stripped and wax once a year. Then Linoleum was the big thing, then no wax vinyl took over and that was the death of resilient flooring. Residential use of cork was dead for decades as housewives and husbands forgotten how to wax a floor.

I think I'm born too late. I looked up cork flooring on the Internet and it's huge with the green movement. Hypo-allergenic, fire retardant, natural insulation, self sealing, good for your joints, all this and it's good for the environment. All this from a tree!

So I made my own cork flooring, 99 cents cork boards, glued to the slab with resilient flooring glue, four or five coats of polyurethane and two coats of wax. The first two pictures shows my homemade cork flooring, the third picture is the manufactured floating I was able to special order from Lowes for about $3.50 a sf. I put it all over the upstairs and lined the stairs with it. I didn't know how to make stair nosing out of cork, so Pine casing will have to do. The contrast is great when you are walking down stairs at night, you can make out the steps.

Monday, December 10, 2007

Finding the Middle Path

Recently, I got this interest for a Festool ROTEX, a $460 sander/polish that hooks up to the vacuum. I did research and found a comparable machine from Bosch for $260. I justified that spending this would make me a better woodworker because sanding is much easier and quicker and a lot healthier since it is dustless, at least that's what I got from the promotional video. Then I summed up the additional expense of all the extra accessories that is needed to make the system useful. I would need extra abrasive disk, pads, vacuum attachments, a place to store all of this. This added up the price and the little tool that would help me do the job turned into a burden. I would have to use this a lot, or it would have to improve my skills by a tremendous amount to justify the purchase. I thought about how I had made the rest of my projects without a sander and realized that my smoothing plane and my two cabinet scrapers and a $2 sanding block were all I ever needed. Desire is a powerful force to deal with. My desire to be a better woodworker, created a desire to get sander. This path would lead me to a large shop filled with tools I cannot master, and that would be a waste. Now, on the other end of the stick, depriving myself of good tools will leave me in frustration as I push wood with a dull chisel. I’m quite sure that mastering the cabinet scraper and the hand plane is the next logical step. So no new tools for me. Is this way of thinking, the path to better woodworking?

Thursday, December 6, 2007

Work Bench by IKEA

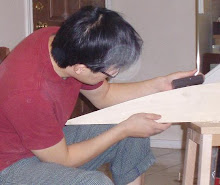
One reason I am able to build furnitures the size of a bed in such a small space is that I don't have a traditional a work bench. I use the floor, or anything that can support a plank of wood, even the project itself. To get the job done, I either clamp it, hold it with my hands and feet or, sit on it . This is possible because I don't mind working close to the floor, and my tools are murderously sharp. Sometimes, I find that getting the work to eye level makes for much more precise and comfortable work, so I found the perfect workbench while getting ideas at a local retailer.

For $9.99 this item from IKEA is the best workbench/saw horse I can buy for the money. They call it Bekvam. It is made of solid European beech held together with confirmat screws and bridle joints. This proves to be sturdy enough for sawing, chopping mortises, or as you can see from earlier picture, larger carving items. The hand grip hole in the middle provides the perfect size to stick the head of the bar clamp in to act as a hold down. It’s a plus when there’s one less thing to buy.

I can sit next to it to do delicate work, or get right on top of it and get some pressure on the wood for aggressive stock removal with my jack pane. Creative use of clamps helps holds the work down, and more recently, my hot melt glue gun.

When it's not on duty, as a workbench, it’s a stepladder to reach the pantry’s top shelf.

Monday, December 3, 2007

The Day Bed

I logged 24 hours to make this day bed. I initiated the project on November 22nd and by December 2nd it was in it's new home upstairs. My wife and I are happy with the result, considering I made up the plans as production progressed. This design on the fly accounted for many hours of my leisurely work pace, stepping back, drinking hot tea, while trying to figure out the next set of moves (which I logged as worked hours). The bed met all of it's requirement. It has a soft light look, with just enough curves, not so much that it looked country. It can be taken apart and assembled in minutes, it is strong, and has a rational portion of exposed joinery and screws. The exposed joinery is my way of showing off my ability and the hidden screws are for quick assembly. Good skill isn't just about cutting that perfect dovetail, it also has to do with getting a quality project completed quickly with relatively little resources. Throughout the project, very little wood was wasted. Even when I made a mistake, the results were accepted and worked into the design. Case in point is the four contrasting dowels at the front legs. I had drilled the holes on the wrong side, so I got some darker wood dowels and make it a through dowel instead of blind dowels. If I should ever have to build another on of these, the result would be different since I learned to avoid certain mistakes, but then I would probably make different mistakes. Last step is to put a several coats of fast drying, hypo allergenic shellac on it.

Wednesday, November 28, 2007

Head Games

The headboard of the Daybed will be made from this piece of poplar I found at Lowes Lowes'. It as a nice big streak of heartwood going through it's entire length. I try to pay attention of grain pattern whenever I do woodworking because only custom made pieces get this treatment. Manufactured pieces are produced at such a fast rate, the process allows no time to consider grain orientation. I like that wild streak of heart wood through the largest part of the bed. Some woodworker say the grain pattern is the soul of the tree. I can respect that, something did moved me to put it there. The darker heartwood of poplar is usually green, this turns many people away from poplar as a serious wood. Most woodworkers use poplar as hidden sec0ndary wood or paint it. However, the green will oxidize to a nice brown if you leave it out in the sun for a couple hours. The tannins in wood is affected by sunlight, we'll talk about this in future posts.

The headboard of the proved to be the biggest challenge of the project. I had to make a large arch on top of the board. This six foot radius was easy enough to draw using my old fashion folding rule as radius, clamped on the fixed end and a pencil draws the partial circumference which is the arch. Cutting it was harder because I didn’t have a bandsaw nor a jig saw. The thought of using the router didn’t appeal to me because I don't like my router. So I cut it straight at the tangents and then hand plane the rest into a smooth radius. The arch is glued to the bottom piece with biscuit, glue and clamps after I jointed the mating pieces so the two pieces will glue tight. The next difficulty is to attach this large piece of solid wood to the back of the bed in a tasteful method, making sure it can be knocked down, yet remains strong enough to provide rigidity for people to lean back against with gusto. I decide to go with a dovetail because it holds itself together without glue or screws. This makes it possivle for me to take it out and carve a design on it one day (when I learn how).

The problem with the pins of my dovetail (for those discerning craftsman reading) is it's weakness to the direction of the grain, even the strongest glue cannot help. I solved this by shooting a bunch of 21 gauge pins into the dovetail's pin for reinforcement. It's not traditional, but it should work. No one knows of this because it is hidden.

Tuesday, November 27, 2007

In My Tool Chest

Here’s a couple useful tools for the small work shop.

The $39 Kreg Pocket Hole Jig is incredibly fast way of joining wood. It is quick and efficient with no learning curve. The system is so well thought out that a novice can learn to make a stronger, more precise butt joint in no time. It actually makes wood working too easy and takes all the craftsmanship out of woodworking. The blue plastic jig is clamped to the wood, a step drill bit bores a hole at the precise depth and angle, an special screw is driven into the hole with the long #1 square drive bit. You can go to Kreg.com to check out their video on the product. The down side is the elliptical hole that is left, so I only use this on hidden parts of the project.

The $25 Cold Heat Freestyle cordless hot melt glue gun is a fun little toy that turned out to be very useful. I use it for quick household repair and as a strong wood working clamp. With a 30 seconds dry time, I found it useful in holding pieces wood together temporarily while I do dry assembly or hand planing small pieces of wood, it also hold templates to wood as well as keeping the wet stone in place while I sharpen my tools. The joy of this tool is that the there’s no wires to get in the way and the gun heats up in about minute or two, so you don't have to stop what you are doing when you are on a roll. The mini glue gun may be targeted for the hobby crafters to glue dried flowers to pine cones, but it proved it usefulness when we had to put up a new sign for the showroom. It was the quickest way hold the granite tiles and the acrylic letters in place while the construction adhesive cures. This little gun saved a day's worth of work since we were able to hang the letter without having to wait for the glue holding the tiles to dry, a dab on each corner is strong enough to hold up granite tiles.

Monday, November 26, 2007

Making My Bed

I spent Thanksgiving with two hundred dollars of wood, some free time a couple new tools I was ready to try out. The goal is a day bed that I drew out in two minutes for approval. I knew What the end result was, I just had no idea how I was going to get there. The details would be ironed out as I progress. This would only work if I think a few steps ahead of any cuts for bore.
I do know of some limitations, the bed would be made down stairs and had to be moved upstairs so I had to make this with knock down ability. The quickest way to make a decent knock down joint from my aresenal is with dowels and pocket screws joint. 3/8" dowels are placed between the mating wood edges and pocket screws pulls them together. I could make pinned mortise and tennon joinery but that would take much more time than I wanted and the mortise would severly weaken the thin legs since they will not be glued for the knock down purpose.
To prevent the bed from racking itself apart, the apron on the front is extra wide. The side has arms and the back has the head board, which keep the thing tight and square. Joining wide solid wood is a tricky thing to do becuse of the expansion nature of the wood, so I had to make the center dowels tight and the dowels at the end had elongate holes to allow for expansion. I betting that the pocket hole screws will flex a bit with the softer poplar wood so the apron should not split once the humid summers comes.
Slats on the bed are joined with dovetails so it would pull the bed together and can easily be removed. The middle slat is made of much stronger oak to bear the weight in case someone wants to stand on the middle of the mattress and exert all the pressure to the least supported piece. I wanted to make sure this bed can handle at least 400 lbs and the additional impact from anyone who want to jump on the bed.
This is the product from twelve hours of work, I will talk about making the headboard and method of making this later.