 It cost $3,000 to renovate my kitchen. What I saved in money, I paid triple the amount in time. I don't have a table saw, so the 68 lap joints needed to make the doors took a week with my Japanese handsaw. I would take a couple weeks off from the project when hand cutting plywood panel became tedious. With proper planning, I was never with out a sink or stove for more than 24 hours. The kitchen still isn't done, I have some small details to take care of, but it's not important and I'll get to it when I'm in the mood.
 Here are some cost saving features.
Flooring is cork board tiles with stain and polyurethane glued to the slab with vinyl adhesive. 99 cents per tile, add labor and four coats of polyurethane.
The counter top is made of concrete with about $150 of material, add one week of laborious grinding and polishing.
The cabinets are made with ¾” birch plywood, cut and assembled in the living room. I didn't want to waste money but, I believe in building things that would last. so I spent the money in good plywood, at $42 per 4x8' sheet. It took six sheets to make the carcass and the shelves, careful planning minimizes waste.
The doors and cabinet frames are poplar dimensional lumber, this mixes well with pine and birch color wise. As for workability, I recommend this wood to any beginner craftsman who favors hand tools, it cuts, planes and chisels easily, and still hold a decently sharp edge.
The handles are hand carved padauk and pine, made from scrap wood.
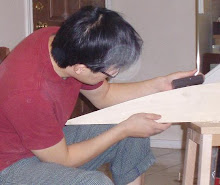
 Doors are joined with half laps and gorilla glue. I routed a rabbet after the joint dried then silicon a ½ plywood panel. I made a similar door in the bathroom a year earlier and it still held together in the steamy bathroom environment. Each doors cost about $15 instead of $70. I may go back and put shaker details putting staggered pegs to each joints.
Front of Drawer boxes are hand cut dove tails, back are dowel, dry erase board panel make water resistant drawer bottoms.
Here are some features of a homemade kitchen
Cabinet sits on a cedar base, making it resistant to water damage.
Cork is soft on the feet, durable, does not promote fire, is self healing to cuts, is hypo allergenic. Canned goods has been noticed to bounce twice when dropped from the five foot level shelf.
Concrete counter top gets stronger with water, is distressed finish so it would look better as it shows wear and tear, the perfect match for the sink side of the kitchen.
Butcher block counter top on the other side does the same for the dry side of the kitchen. Oil splatters only feed the wood counter top and gives it a nice patina. Excellent for quickly chopping herbs for the last minute addition to a dish.
By fitting the 18 cubic ft. fridge, in the old pantry, I gained 9 more square feet of counter . and created a more efficient pantry. I figured we live don't need enough food to last the winter, so a large fridge and pantry is excessive.
 Finally a place for the dogs’ food bowls.
Tilt out rice and grain bin.
Pull out pantry unit next to range for sauces.
Tea and packaged spices and food organization.
One cubic foot holds 10 bottles of wine and sauces.
Counter top on book case reaches over and ties the fridge to the kitchen.
Lattice work on sink base keeps the condensation under the sink from getting clammy and moldy.
Exposed side of wall cabinet turned into cork board.


1 comment:
wow- that is amazing that you saved that much money and your kitchen looks fabulous! Great job!
Post a Comment