Monday, December 29, 2008

Last Project of the Year

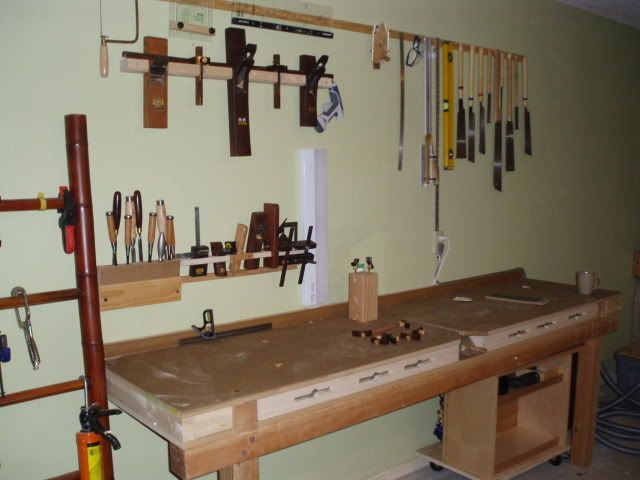
This year went by too quickly. I managed to move to an actual house with a garage and then added two German Shepherd Dogs to the family. This is severely affected my woodworking time. But many woodworkers would agree that the fun of this hobby is problem solving. I took the time constraint into consideration when I built a workbench in the new garage/shop. All the tools needed were exposed and within easy reach. You see, my solution was to build things quicker. This meant getting to the tools faster as well as a change in design and philosophy.
So the idea is to get rid of SOME of the old world craftsmanship hype and adopt modern day techniques that has proven itself in the industry over the last 50 years. I can say this because I can hand cut a dovetail or chop a mortise with a chisel like they did 400 years ago. I just don't have time to do that that to anymore. The dogs need their walks and my wife needs a desk for her computer. I want to make more than two projects a year. There's too many ideas in my head that need fruition. Somethings has got to give and it's not the wife nor the dogs.
Screws and nails to the rescue!
More importantly that's pocket screws and wooden dowels acting as nails. The result is a Computer desk that took me less than six hours to conceptualize and built. Not much happened in the area of design, as I had to build a desk that is 23" deep by 45" wide, the height is a standard 29" high. The table got four legs and a plywood top. That's as basic as it gets.
So here's my shortcut. All four legs are tapered by cutting wedges off the square stock with the circular saw with a guild rail. I eyeball much of operations, meaning none of the legs are identical to each other. They are all different sizes. I saved layout time, and they are far apart from one another that no one can tell the difference anyways, anyone who is bothered by this shouldn't be on his hands and knees in MY house measuring the leg of a computer desk!
Aprons are attached to legs with dowels and pocket screws. This let me assemble as I cut, making changes and noticing problem areas as I go along. Saved a lot of time from over analyzing and designing. I can quickly take things apart to tweak any parts, luckily I have enough experience that this project came together with very little resistance from the forces that be.
Not a single miter joints anywhere. That's right, even the edge band is rough cut, glued and pinned to the plywood, and then next piece is butted to it. This way, I can trim everything to length after the glue up with the Japanese hand saw. Then everything is planed smooth while on top with radii plane and block plane. It saves measure time and I didn't need to take out the miter saw.
The plywood top was previously finished as it was rescued from a closet I had dismantled at the old house. This means it's dimensionally stable, so a few pocket screws from the apron and it's secured.
Sure there's no hunched tennon with locking pins on this table, but I built this table in 1/3 the time and it looks just as good and is just as strong. I'm beginning to look forward to next year because my wife will be enjoying some furniture instead of waiting for me to complicate an otherwise simple task of joining two pieces of wood. Here's to progressing as a woodworker.

Tuesday, August 26, 2008

The Work Bench

I built this workbench for the new workshop several months ago, when I had the day to myself. It was one of those lofty goal moments since I had no idea what I was building. I didn’t plan much, I stopped by Agent Orange on the way home from work the day before and asked them to rip a sheet of MDF to 23-1/2 “ wide. Got some 2×3 pine to along with that, total price, $28. The rest of the materials were things I had saved from my old shop, a couple of 4×4 redwoods and some 1×3 poplars.

I did know the bench would be built permanently onto the wall, it would have a way to clamp wood for planning and cutting dovetails and tenons. That was it. My last work bench was an IKEA stepstool I had purchased for $9.99. It’s design would inspire my new workbench by having a multipurpose slot on the top. So I went to work. Now, I’m not good at taking pictures of the procedures since it slows down my creative process. But this is the final product. Six hours of work and about $60 worth of materials. I hope it works. The slot is designed for my Japanese saw, it cuts on the pull stroke, so I use the downward force to hold down the wood. This notch gives me clearance as I like to kneel and cut on the down stroke. The front slots is for clamps, there’s plenty of holes so it offers plenty of flexibility. I have more ideas on jigs and attachment for my bench, but that will have to wait for later. The top is held down my gravity and wood dowels, hammered in and cut flushed. This lets me flip the top and change it should it wears.

Sunday, August 24, 2008

The Doors

San San the new German Shepherd Dog has figured something out. She knows we can never give her a correction unless she is caught in the act of doing something bad. So she waits until we are out of sight then she'd get on the kitchen and find things to play with. If food isn't available, then anything that she can shred would suffice. So the best way to correct the problem is to take away the opportunity. This is why I love these older house with lots of room. None of this open living concept with a great room for us. All I have to do is build a door where there's a doorway to close down the kitchen half of the house. The problem is they don't make standard doors to fit a 47-1/2" opening and this house was built in 1985, so it settle since then. The doorway is no longer square. So the task is to build two custom doors that: 1. Fits in the odd opening. 2. Is made out of square to fit in the odd opening 3. Locks out a very curious 65 pounds dog. 4. Looks attractive when opened, like it's not a piece of plywood set up to block a dog. 5. Can be removed and the existing doorway and molding is not damaged beyond repair. 6. Make it quick and cheap. So here it is, 3/4" oak veneer plywood, and 1x 2 dimensional lumber and edge band, Braded, Glued and wooden nailed to the plywood. The trick is to make the first door over sized, then scribed the door to fit the opening on three side, the center edge is left perfectly vertical. The second door is then created to fit the remainder space. The Second door is 1/2" smaller than the first for sake of easy math during construction. I knew that no one would notice the difference of 1" so, spending time on it was moot. So here's the result of the fitting. The next step is to take the thing apart and finish the door. Inside would have to done in a way to minimize scratch marks,the side that shows from the entrance or in the open position would have the shoji screen look. That would be for next time.

Thursday, June 26, 2008

Off the Subject: Brisket

I'm going to stray from the usual topic today. This weekend I had a chance to buy brisket at 99 cents a pound at the local Super Target. I thought I would try to smoke a Brisket now that I have a back yard now and a new vertical water smoker from Brinkman ($59 Home Deopt). This is my way of multi-tasking; make a bookcase while roasting a rack of rib.

To get a moist and tender brisket, the tough cut of meat is slowly heated to about 190 degrees internal temperature. This slow and steady process breaks down the tough muscle and its' membrane and turns it into tender juicy meat. The formula is 1.5 hours per pound at about 220 degrees. This adds up to about 15 hours of smoking for a 10 lbs brisket to hit perfection. It’s hard to dedicate this amount of time for the average person, so I’ll use some time management to get good result without spending 15 hours babysitting a brisket.

  1. The meat is probably the most important part of the process. Buy a smaller 8 pounds brisket and cooking time gets cut down to 12 hours. This is much more manageable than the larger sizes as it fits in the smoker with enough room for the smoke to surround it. Find a brisket with good marbling of fat and meat. Since this is hard to see through the plastic vacuum packs, pick a piece that is soft and bendable. Meat with higher fat marbling bends and flexes more than leaner cuts.
  2. Preparation; leave the brisket out all day to reach room temperature. Smoking a refridgerated cold brisket slows the process down tremendously. Some people also advise s you to marinade it in a slight acidic bath to break down the protein. Ignore it since heating it correctly will do the job. Half hour before it goes into the smoker, rub the meat with BBQ spice rub. I make my own rub with salt, pepper, paprika, cayenne peppers, sugar and MSG. Putting the rub on too long will it dry out the meat. Don't be afraid to put a lot on, most will fall off or burn off. I don't use fancy herbs and spices, the prolonged heating session will often neutralize any herbal flavor. Some people tells you to trim the fat cap to 3/8 of an inch thick. I Leave the fat on, I just cut slashes in the fat cap and force some of the rub in there as well.
  3. Heat the meat. This depends on what type of heating system you use, I use to throw it in the oven at 225 degrees for 12 hours and then drain the fat dripping occasionally. I now have a vertical water smoker that works well. Hot charcoal briquettes are put on the bottom pan along with wet hardwood chips to produce the heat and smoke. A water pan is place between the meat and the fire to block the direct heat and the water keeps the temperature below 212 degrees, it's so simple.
  4. Maintaining the heat is the hardest part for the charcoal user. It is hard to control the heat by adjusting the vents, and the change in temperature would need a half hour before it can be registered by the thermometer. So I would have to rely on experience to judge the temperature change. I think the flavor is best with charcoal and hardwood so I am willing to put in the effort. I do have to modify the Brinkman smoker. I am having problem with the ashes smothering the coals as it burns in the coal bin. The goal is to maintain a constant heat throughout the session with minimal effort. I think a coal grate would work so that ashes would fall away from the red glowing coals.
  5. Simpify. Keep adding coal and wood chunks or chips for the first six hours, replenish the water and try not to open the smoker door too often. This cools everything down and slows down the cooking session. If I started the smoking process at 6pm, and trust my ability to make a fire that stays lit by giving it just enough air and fuel, then at midnight, the outside of the brisket would’ve turned black from the smoking. This is not burnt as the blackness is actually a very thin layer, the red smoke ring follows, this is a physical sign that smoke had penetrated the meat and is filled with this unique flavor. I would then take the brisket and place it in a preheated oven at 210 - 225 degrees. The oven will maintain the constant heat needed while I get some sleep. I will wake up to an amazing smell in the kitchen and moist and tender brisket.
  6. Leave the brisket out for a hour to cool, slice some across the grain thinly and have some for breakfast. Then wrap the remainder tightly in plastic wrap to keep the moisture. This can stay out for the afternoon BBQ.

Friday, June 13, 2008

Bookshelves by Myself

This bookcase has been sitting quietly in the corner of the Condo for the last five years doing its' duty. Filled with books, it's just another bookshelf. But when we moved, I had a chance to show off it's glory. The back panel is a book matched piece of birch I was lucky enough to find at Home Depot. After visually inspecting about seven 4 x 8 sheets of 1/4 plywood, I managed to find a piece I really liked. I'm not one to waste wood, but to get the heartwood flame shaped pattern centered, it was worth cutting out the unwanted parts.

This is the first project I built with my biscuit joiner, this was five years ago, when I swore the biscuit joiner was the greatest invention ever for cabinet building. I then realized it has it's strength and it's limitations. I didn't use much of it since because the joiner needs a very flat work surface to be precise, something i didn't have in the condo with poorl;. I'll revisit the tool now that I have a garage with a large flat floor.

I didn’t have a circular saw back then, so I had the people at the big box store rip the plywoods down to 11-1/4” pieces so I can fit in the back of my hatchback. I tried to use every piece of wood. This is biggest size bookshelf I can make from a sheet of4×8’ -3/4” birch and a one 1/4” birch. Stock inside corner molding and 1×2 made up the trims. Little legs gives is a nice furniture feel. Unfortunately I think it looks better without books covering up the back panel.

Wednesday, June 11, 2008

Well, This Changes Everything

I'm finally returning to my blog after a long break. We've been busy bonding with San San, a German Shepherd that joined the family in March '08. This requires a house and a yard and a Home owner association that doesn't frown upon 65 lbs dogs, nor tenants who does woodworking in the living room.

Things are finally coming together in our new place. We moved to our new house in February 08 and had been working hard to get to the point where I can start on my workshop. I'm hoping lots of new projects and ideas will come out of this house and workshop.

I swore to myself that would always appreciate this new workshop and never complain about not having enough space as the place starts filling up with things I just can't live without. I'm hoping the luxury of having more space doesn't change my philosophy that as a hobby I can work on my technique instead of relying on dedicated machines.

Here’s the result from several weekends of work. Finally a real workbench for this woodworker. Fresh paint went on the walls after I removed the existing shelving nailed onto the walls twenty years ago. This color is the result of me mixing all the paint the previous owner had left behind into a 5 gallon bucket. Luckily my wife is happy with this color, she likes happy shades of green. We park her car on the other half of this garage, so a happy color is important to come home to after a long day’s work, it also neutralizes the mess I’m going to make.

I will get deeper into the construction of the shop on later post.