Saturday, January 24, 2009

The Eating Bar

Before I got into cabinetry and woodworking, I was selling flooring.  The quest to understand woodflooring got me into woodworking and so it goes.  My other specialty aside from carpets is tiles.  So The project for this week is a floating granite tile countertop.
Granite tiles are 18" x 18" batic brown granite I purchased from work at the employee price of $2.22 psf.  The wood deck is 24" x 96" piece of birch plywood.  That is then ripped to 18" depth x 77-1/2.  this fits the wall at my brother's  with the 1.5" worth of  edge treatment I plan to add with oak.  The remainder of the plywood turns into the cleat on the wall to hold the countertop up and the angle support to hold up the deck.
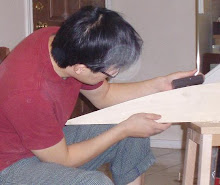
I got the jig saw out this time to get some curves into the work.  I thought the bar could use a little more details since it will pretty much a big feature in the room.  The two angle supports are cut from the left over square piece of plywood.  The curves are hand drawn with my elbow acting as an anchor point and the pencil makes and arch and cut freehand with the jigsaw.  I figured I could draw a decent arch, it saves time and no one will look that close and judge how perfect the arch is.  The only time things need to be perfect is when one has to fit inside another as a lide or joint or a door.  Anything else, is not worth the trouble.  The first is a template for the second arch, again, close enough is good enough, sharp new blade and a variable speed Metabo jigsaw minmized the tearouts during the cross cuts.
In order for the granite to adhere to the decking, I had to put on some hardibacker.  This is
 screwed onto the plywood.  The chinese made birch plywood is pretty poorly made.  Though plywood is pretty stable when it comes to expansion, the problem is that the tiles is only as strong as the glue that holds the pieces of wood together.  The hardiback gives a very good substrate for the mortar to hold the tiles to, and the 30 odd screws holds the substrate to the plywood deck.  Expansion, and deflection has been dealt with.  
Before the tiles can be glued on, I had to put an oak edgeband on it and then route the profile on it with the router and the viarablespeed router control  I talked about last week.   This makes the profile of the edgeband  align perfectly.  I left the edgeband proud of the tiles, leaving just enough space for the thinset so left the tile up a tad.  So as it stands this is what the project looked like after five hours of work in the shop and one hour of installation at the site.  Next step is to take the cap for the bar.  But that would have to wait as I have two more projects to attend to.

Saturday, January 17, 2009

Taming of the Shrill

I finally like my router. I purchased a Craftsman router about six years ago, when I first decided to do get into woodworking.  It’s a one horsepower basic model I purchased for $99.  Norm Abram used it all the time in New Yankee Workshop and I felt I should have one.  I plugged it in, turned it on, and the bit grabbed the wood, shot shavings all over the place as the motor screams to a deafening sound, dust filled the living room and then the smoke alarm went off.  I wrapped up, put it away and rarely used it unless absolutely necessary.

That episode along with my table saw purchase scared me into hand tools.  I am glad because the use of hand tools slowed me down and allowed me to be a better woodworker, being more in tuned with the wood and the cutting process.  But I'm getting older and hand cutting with expensive handsaws is getting old.  I want more efficiency.  Do I want more power?

The power comes from an electric motor. Our shopping culture is obsessed with the “more power” concept.  The manufacturers would gladly take a cheaper weaker ¾ horsepower motor, tweak it to provide maxium power though not efficiently and sell it a 1 horsepower router that screams to the top of it’s lung each time it is turned on.

After hand cutting wood for all these years, I found that my 1/10 horsepower right arm can cut pretty well with a sharp blade.  So I purchased a variable speed router controller hoping this would tame the router.  At $39 this device pulse current to the motor so that it runs slower.   Since it sends pulses of full current like a capacitor and not weakened the current like a resistor, the torque of the motor is not sacrificed.  This little addition tamed my once loud screaming uncontrollable wood burner to a civilized piece of wood sculpting masseur.  Of course I have to make more passes with the router since it takes off less pieces of wood at a time, but I don’t have the loud sounds, I don’t have the pieces of wood shooting across the room, and not cloud of dust that sets off the fire alarm.  I’m beginning to like variable speed power tools.  This will change the way I work.

Monday, January 5, 2009

No Surfing Allowed

As part of my plan to get more woodworking done in 2009, I made a gate for the kitchen, keeping the place off limits to the dogs.  Well behaved as they pretend to be, they cannot resist the urge to counter surf when we’re not around.  The solution was to train the dog not to do this, not leave food on the counter or build a gate.  The latter was the easiest choice.

Now, another part of my resolution was to be less of a pack rat.  This meant I had a bunch of parts and wood laying around that I planned on using one day and then I have my “do people realize how much this junk cost?” pile.  So the gate would be made from left over parts I have laying around in the garage.  Now as the title suggest, I am the Cabinet Guy so what I have laying around is more elaborate than what most people have in their garage, so this is not staged.  For example a 21x54” cabinet cherry door from a client who swore this door was warped and wanted a new one, until it turned out the box was warped and the doors wasn't.  And some very nice 270 degree swing frameless cabinet hidden cup hinge which I bought for my condo kitchen project, but decided against it because I got lazy and took a short cut.


First thing was to get the door to the stretcher to  increase 5” in width.  No, just kidding, I couldn’t afford that contraption.  I just cut off the routed edges and then joined 3x6” oak to it with #20 biscuits.  The joints on cabinet doors are pretty weak, so I drilled and glued in a bunch of 3/8” dowels from the new extra wide styles to the rails.  That should make it strong enough for some abuse.  Oak joined next to cherry?  Yes.  I don’t care,, the dogs are going to scratch the heck out of it anyways and I stained the oak the match the existing oak trim to make it a little classier.  I did hand carved the end grain of the oak to match the profile of the cherry d

oor.  It’s the details I’m after in this project.


The door hangs on cabinet style European cup hinges from one of my past projects. I only have two, clearly not enough to handle the weight of this newly expanded door, so I solve it by putting a swivel cast I happen to have in my “pile”.   


That’s the project.  The whole thing can be removed when I’m ready to sell the house with out any damage to the existing casing. 

Monday, December 29, 2008

Last Project of the Year

This year went by too quickly. I managed to move to an actual house with a garage and then added two German Shepherd Dogs to the family. This is severely affected my woodworking time. But many woodworkers would agree that the fun of this hobby is problem solving. I took the time constraint into consideration when I built a workbench in the new garage/shop. All the tools needed were exposed and within easy reach. You see, my solution was to build things quicker. This meant getting to the tools faster as well as a change in design and philosophy.
So the idea is to get rid of SOME of the old world craftsmanship hype and adopt modern day techniques that has proven itself in the industry over the last 50 years. I can say this because I can hand cut a dovetail or chop a mortise with a chisel like they did 400 years ago. I just don't have time to do that that to anymore. The dogs need their walks and my wife needs a desk for her computer. I want to make more than two projects a year. There's too many ideas in my head that need fruition. Somethings has got to give and it's not the wife nor the dogs.
Screws and nails to the rescue!
More importantly that's pocket screws and wooden dowels acting as nails. The result is a Computer desk that took me less than six hours to conceptualize and built. Not much happened in the area of design, as I had to build a desk that is 23" deep by 45" wide, the height is a standard 29" high. The table got four legs and a plywood top. That's as basic as it gets.
So here's my shortcut. All four legs are tapered by cutting wedges off the square stock with the circular saw with a guild rail. I eyeball much of operations, meaning none of the legs are identical to each other. They are all different sizes. I saved layout time, and they are far apart from one another that no one can tell the difference anyways, anyone who is bothered by this shouldn't be on his hands and knees in MY house measuring the leg of a computer desk!
Aprons are attached to legs with dowels and pocket screws. This let me assemble as I cut, making changes and noticing problem areas as I go along. Saved a lot of time from over analyzing and designing. I can quickly take things apart to tweak any parts, luckily I have enough experience that this project came together with very little resistance from the forces that be.
Not a single miter joints anywhere. That's right, even the edge band is rough cut, glued and pinned to the plywood, and then next piece is butted to it. This way, I can trim everything to length after the glue up with the Japanese hand saw. Then everything is planed smooth while on top with radii plane and block plane. It saves measure time and I didn't need to take out the miter saw.
The plywood top was previously finished as it was rescued from a closet I had dismantled at the old house. This means it's dimensionally stable, so a few pocket screws from the apron and it's secured.
Sure there's no hunched tennon with locking pins on this table, but I built this table in 1/3 the time and it looks just as good and is just as strong. I'm beginning to look forward to next year because my wife will be enjoying some furniture instead of waiting for me to complicate an otherwise simple task of joining two pieces of wood. Here's to progressing as a woodworker.

Tuesday, August 26, 2008

The Work Bench

I built this workbench for the new workshop several months ago, when I had the day to myself. It was one of those lofty goal moments since I had no idea what I was building. I didn’t plan much, I stopped by Agent Orange on the way home from work the day before and asked them to rip a sheet of MDF to 23-1/2 “ wide. Got some 2×3 pine to along with that, total price, $28. The rest of the materials were things I had saved from my old shop, a couple of 4×4 redwoods and some 1×3 poplars.

I did know the bench would be built permanently onto the wall, it would have a way to clamp wood for planning and cutting dovetails and tenons. That was it. My last work bench was an IKEA stepstool I had purchased for $9.99. It’s design would inspire my new workbench by having a multipurpose slot on the top. So I went to work. Now, I’m not good at taking pictures of the procedures since it slows down my creative process. But this is the final product. Six hours of work and about $60 worth of materials. I hope it works. The slot is designed for my Japanese saw, it cuts on the pull stroke, so I use the downward force to hold down the wood. This notch gives me clearance as I like to kneel and cut on the down stroke. The front slots is for clamps, there’s plenty of holes so it offers plenty of flexibility. I have more ideas on jigs and attachment for my bench, but that will have to wait for later. The top is held down my gravity and wood dowels, hammered in and cut flushed. This lets me flip the top and change it should it wears.

Sunday, August 24, 2008

The Doors

San San the new German Shepherd Dog has figured something out. She knows we can never give her a correction unless she is caught in the act of doing something bad. So she waits until we are out of sight then she'd get on the kitchen and find things to play with. If food isn't available, then anything that she can shred would suffice. So the best way to correct the problem is to take away the opportunity. This is why I love these older house with lots of room. None of this open living concept with a great room for us. All I have to do is build a door where there's a doorway to close down the kitchen half of the house. The problem is they don't make standard doors to fit a 47-1/2" opening and this house was built in 1985, so it settle since then. The doorway is no longer square. So the task is to build two custom doors that: 1. Fits in the odd opening. 2. Is made out of square to fit in the odd opening 3. Locks out a very curious 65 pounds dog. 4. Looks attractive when opened, like it's not a piece of plywood set up to block a dog. 5. Can be removed and the existing doorway and molding is not damaged beyond repair. 6. Make it quick and cheap. So here it is, 3/4" oak veneer plywood, and 1x 2 dimensional lumber and edge band, Braded, Glued and wooden nailed to the plywood. The trick is to make the first door over sized, then scribed the door to fit the opening on three side, the center edge is left perfectly vertical. The second door is then created to fit the remainder space. The Second door is 1/2" smaller than the first for sake of easy math during construction. I knew that no one would notice the difference of 1" so, spending time on it was moot. So here's the result of the fitting. The next step is to take the thing apart and finish the door. Inside would have to done in a way to minimize scratch marks,the side that shows from the entrance or in the open position would have the shoji screen look. That would be for next time.

Thursday, June 26, 2008

Off the Subject: Brisket

I'm going to stray from the usual topic today. This weekend I had a chance to buy brisket at 99 cents a pound at the local Super Target. I thought I would try to smoke a Brisket now that I have a back yard now and a new vertical water smoker from Brinkman ($59 Home Deopt). This is my way of multi-tasking; make a bookcase while roasting a rack of rib.

To get a moist and tender brisket, the tough cut of meat is slowly heated to about 190 degrees internal temperature. This slow and steady process breaks down the tough muscle and its' membrane and turns it into tender juicy meat. The formula is 1.5 hours per pound at about 220 degrees. This adds up to about 15 hours of smoking for a 10 lbs brisket to hit perfection. It’s hard to dedicate this amount of time for the average person, so I’ll use some time management to get good result without spending 15 hours babysitting a brisket.

  1. The meat is probably the most important part of the process. Buy a smaller 8 pounds brisket and cooking time gets cut down to 12 hours. This is much more manageable than the larger sizes as it fits in the smoker with enough room for the smoke to surround it. Find a brisket with good marbling of fat and meat. Since this is hard to see through the plastic vacuum packs, pick a piece that is soft and bendable. Meat with higher fat marbling bends and flexes more than leaner cuts.
  2. Preparation; leave the brisket out all day to reach room temperature. Smoking a refridgerated cold brisket slows the process down tremendously. Some people also advise s you to marinade it in a slight acidic bath to break down the protein. Ignore it since heating it correctly will do the job. Half hour before it goes into the smoker, rub the meat with BBQ spice rub. I make my own rub with salt, pepper, paprika, cayenne peppers, sugar and MSG. Putting the rub on too long will it dry out the meat. Don't be afraid to put a lot on, most will fall off or burn off. I don't use fancy herbs and spices, the prolonged heating session will often neutralize any herbal flavor. Some people tells you to trim the fat cap to 3/8 of an inch thick. I Leave the fat on, I just cut slashes in the fat cap and force some of the rub in there as well.
  3. Heat the meat. This depends on what type of heating system you use, I use to throw it in the oven at 225 degrees for 12 hours and then drain the fat dripping occasionally. I now have a vertical water smoker that works well. Hot charcoal briquettes are put on the bottom pan along with wet hardwood chips to produce the heat and smoke. A water pan is place between the meat and the fire to block the direct heat and the water keeps the temperature below 212 degrees, it's so simple.
  4. Maintaining the heat is the hardest part for the charcoal user. It is hard to control the heat by adjusting the vents, and the change in temperature would need a half hour before it can be registered by the thermometer. So I would have to rely on experience to judge the temperature change. I think the flavor is best with charcoal and hardwood so I am willing to put in the effort. I do have to modify the Brinkman smoker. I am having problem with the ashes smothering the coals as it burns in the coal bin. The goal is to maintain a constant heat throughout the session with minimal effort. I think a coal grate would work so that ashes would fall away from the red glowing coals.
  5. Simpify. Keep adding coal and wood chunks or chips for the first six hours, replenish the water and try not to open the smoker door too often. This cools everything down and slows down the cooking session. If I started the smoking process at 6pm, and trust my ability to make a fire that stays lit by giving it just enough air and fuel, then at midnight, the outside of the brisket would’ve turned black from the smoking. This is not burnt as the blackness is actually a very thin layer, the red smoke ring follows, this is a physical sign that smoke had penetrated the meat and is filled with this unique flavor. I would then take the brisket and place it in a preheated oven at 210 - 225 degrees. The oven will maintain the constant heat needed while I get some sleep. I will wake up to an amazing smell in the kitchen and moist and tender brisket.
  6. Leave the brisket out for a hour to cool, slice some across the grain thinly and have some for breakfast. Then wrap the remainder tightly in plastic wrap to keep the moisture. This can stay out for the afternoon BBQ.